Friday, August 7, 2015

final reflections

It's been a crazy summer, experimenting with numerous digital tools for LIBS 602 and reading 40 children's books for LIBS 642, but everything has been rewarding. In both classes, I learned about new resources I can use as a teacher or a school librarian, and I've come away with a conference presentation that's "ready to go," should I ever be "ready to present":


Because no presentation tool I could find (either on my computer or web-based) allowed me to embed HTML code, I decided to use Wix and create my presentation as a website. It was not very difficult to do: I selected a very simple template, deleted pretty much everything, and added "back" and "next" buttons to each webpage so that someone viewing it would go through the pages in the appropriate order. I've even attached the conference presentation script in the traditional website menu, because otherwise the minimalist webpages don't make much sense!

Since this blog focuses on all of my favorite tools from LIBS 602, I figured I would take a few minutes to reflect on the course. I already had some experience with design and some web-based tools (I was yearbook adviser and am my school's webmaster), but I had not seen many of the online tools presented through the Sandboxes of the course; I'm excited to use these with my English students this year! 

The Summer Institute was very informative as the sessions allowed me to get answers to a lot of my questions about my course of study and the Master's program. I think that sometimes we don't even know we have questions until someone gives us the opportunity to ask! The only downside was that the sessions quickly got full, and except for the ones specific to the course of study (Master's Paper, Advising Q&A, Library Resources, and Portfolio), I'm sorry to say that I did not find the sessions very useful or helpful. I will make one exception for the Using iPad Apps session, because even though we don't have iPads at our school, the I think I could implement a similar activity and I liked the premise.

I also enjoyed the group project part of the Summer Institute, but probably mostly because I was my group's technician and actually got to play around with the copper wire and LED lights. I wish I could think of a relevant way to mimic that activity in my secondary English classes... I already use group contracts and surveys, but I haven't had students document and present their progress during group projects before, so that's something new I could use.

Overall, I enjoyed this course!

Sunday, August 2, 2015

teaching and learning

I have been exploring the ALA Best Websites for Teaching and Learning, and have found a few interactive tools for teachers and students. Unfortunately, though all of these websites are identified by ALA as free and web-based, I noticed that some required a download to a computer, and others had free limited versions that were not nearly as useful as their purchased upgrade options. I also found a few of these websites to still be in development and to contain (yikes!) grammatical errors that, in my mind, really undermined the professionalism and classroom uses. Overall, I was quite underwhelmed by these "best" websites, but I found a few that seem actually usable:

  1. I really like the premise behind PearDeck, and think that it offers a unique solution to interactive, formative assessments. The tool allows teachers to create presentations with slides (like PowerPoint) that have both a "presenter" and a "student" view. Teachers and students both login to the same presentation: students might on the projector screen see a picture, but on their computers a multiple choice or drag & drop question to answer. The greatest downfall with this application is that for the teacher to be able to review student responses, he or she needs to upgrade to the premium version of PearDeck (for educators, $8-12 per month, depending on if its a monthly or yearly subscription).
  2. Booktrack Classroom has some neat uses in an English classroom. Especially at the secondary level, the ability to add a soundtrack to stories can be useful in assessing student reading comprehension and attention to themes, symbols, and mood. I played around with this one a bit by copying a public domain poem as my "story" and searching through some pretty neat sound effects to add to certain lines and phrases.
  3. Do your students love playing Jeopardy review games in class, but you just get bogged down with all the linking within PowerPoint, or constantly rewriting the entire grid on the white board? The free version of FlipQuiz is basically just an online, editable Jeopardy game that is super easy to create. The test review use for this tool is pretty much self-explanatory, but I actually prefer the idea of having students create Jeopardy games for quick class review of group presentations. If students have just presented material to the class, it's just as important for them to "check for understanding" as it is for teachers, and because FlipQuiz is so easy to use, students can easily use it!
Lastly, all of the exploring I have done over the course of the summer has opened my eyes to what it means to teach with technology. I've always tried to push the instructional technology uses in my classroom, but this usually just means I've come up with ways to make something traditionally done on paper, paperless. I've had a classroom website, had my students use Google to layer collaboration with documents and presentations, and initiated student blogging. However, the tools I've explored here are much more about giving students "hands on" experiences with creating and designing products that can assess their understandings of skills and concepts from class. So, along the lines of continuing to expand my own understanding of what it means to educate with technology, I plan to start following Will Richardson's blog, Will Richardson: Read Write Connect Learn, because most of his posts promote discussing, questioning, and reconsidering the role of teachers today.

Saturday, July 18, 2015

presentation tools

A veritable plethora of presentation tools exist online and as apps for mobile devices, and the implications for education can be both time-wasters and time-savers for educators. Let me explain: as I started playing around with available tools, I became enthralled with all of the possibilities, started playing around, and lost track of my real goal, which was to get a sense of what the tools could do, not create something new for my classroom (or myself) with each one. So, as not to waste your time as well, let me get right to my two favorite tools:

ThingLink allows the user to add interactive elements to an image. In my example below, I've provided simple textual analysis of elements of the painting, but users can also add audio, video, web links, or other images. For teachers, this tool can provide an interactive way for teachers to lead students to instructional content. What I made is something that a student analyzing images (paintings, advertisements, photographs) as part of a history, English, or art class could create to show his or her understanding of visual composition and purpose.


Blendspace probably has more uses for teachers than students. It provides templates for content and easily allows users to search and insert content from Youtube, Google, Flickr, and others, link to a webpage, upload a file or image, or create a quiz. I created a Blendspace on MLA formatting where I embedded two Youtube Videos, uploaded two documents I usually give to my students, and linked to a website. All of the information is now in one place for students, and the quiz at the end assesses whether or not they have looked at the content provided. Now, instead of spending 15 minutes of class time explaining this to students, they can look at it in their own time and as many times as they need to. In my classroom, I would probably link this Blendspace to a QR code at the top of every paper assignment I give out.

Sunday, July 12, 2015

the future is here!

It used to be that writers such as H.G. Wells held the market for Science Fiction, but sometimes these classic futuristic stories don't seem quite as "fictional" as they once were: enter, the real world of robots. Automated machinery in assembly lines has existed for decades, but new advancements in the fields of computers and robotics make these intelligent machines nearly ready to be marketed for private use. Educators have some very real possibilities to look forward to, especially as libraries across the country start to invest in Makerspaces with 3D printers (a very neat kind of robot!).

Art classes used to focus on a student's skills with paint and mediums such as clay, but 3D printers allow students to create computer-generated artistic designs, a practical application that could prepare students for fields in special or visual effects, engineering, or programming. The same applications exist for students in science or computer classes.

I also like to imagine a library where a robot can have a brief exchange with a student, then be able to recommend a book and take the student to the appropriate place on the shelves or request the book through an interlibrary loan. Such engaging and new technologies might be exactly what it takes to get reticent readers suddenly interested in the process of selecting books to read. Note that these robots would not be replacing school librarians, but could supplement a human's knowledge and experiences with a database of thousands of book options.

There are some pretty obvious applications for robots and coding in computer classes, because instead of just writing code students could test and "see" their coding and evaluate its success. My mind is taking me to some somewhat unrealistic places here, but what if English students could program a robot to act out a Shakespearean monologue?

Ubiquitous access to these technologies is still years in the future, but it's worth bringing to the attention of educators who might be able to petition for funds or at least keep in mind what the future could bring to their students.

Sunday, June 28, 2015

modern media: QR codes


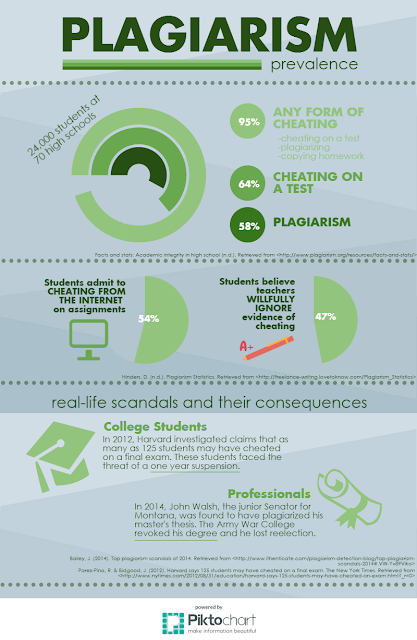
With a free QR reader like i-Nigma, you can scan and immediately go to the linked content on a mobile device. This one goes straight to an infographic about cheating and plagiarism--not a bad image for students to be able to see at their fingertips!

modern media: videos

Videos have become prolific in today's world: YouTube in particular provides viewers with numerous and varied videos that provide everything from the entertainment of watching babies laugh to the education of learning the nuances of Euclidean geometry. We are drawn to the humorous, sentimental, exaggerated, and shockingly true, and the more creative the video, the more we want to watch it and share it.
"Videos" in the classroom ten years ago meant watching recordings of Bill Nye the Science Guy or the movie version of To Kill a Mockingbird, but with the proliferation of online videos and online video-making tools, "videos" in the classroom can now also mean that students can create movies of their own or teachers can more effectively use a personalized flipped-classroom model.
Here are a few video tools and ways they can be integrated into the classroom to encourage critical thinking and creativity:

  1. The templates in Wideo make this tool seem geared toward product promotions and presentations, and would incorporate well into a classroom discussion of media and advertisements. Students could use the Wideo templates to easily "sell" any sort of product, from an idea to an object, and they can practice with appeals and other persuasive techniques. Though the "educational" templates sell themselves as ways for students to more creatively submit homework, this just seemed tedious and unnecessary for both the student and teacher; however, students could probably incorporate a quick Wideo at the beginning of a presentation to quickly engage their peers; helping students at least be aware of a tool like this might help them seek more creative options than PowerPoints.
  2. Pixiclip and Jing are the two tools an instructor would find most helpful in a flipped-classroom environment, but students could use these tools as well. To a large extent, they put the student in the "teacher" chair, and could be incredibly useful if student groups prepared video reviews of critical concepts or vocabulary before a test; research shows that "teaching" is often the best way to learn! Both take a bit of practice to be used to their full potential, and "ad libbed" audio would be risky for a teacher or student, so I recommend a script first.
  3. Powtoon, even its basic, free subscription, can allow students to create cartoon versions of book plots or historical events; if you want students to be creative and think on a higher level, consider asking them to create interactions between characters from two different books or historical time periods. I used Powtoon to create a short cartoon of a teacher announcing a research paper assignment to his students, who, to his chagrin, became anxious and scared until the school's librarian came to the rescue. It took a few hours to master the tool and the nuances of the timing, but I think a few teacher-made videos like this (and I mean a few) throughout the year can help add some humor to the classroom. You can view my video below.

Wednesday, June 17, 2015

engaging school communities

Glodowska, D. Book. CC0. Edited with Blabberize.

A website for a school library can serve multiple purposes, but the most important seem to be
  1. provide information
  2. invite collaboration and participation in the both the physical and online library spaces
As I looked through some sample library websites, I found that there is a lot of information libraries can communicate to the school community: research and paper resources, library catalogs, upcoming events, resources for specific classes, and online tools (I saw a few links to the audio tools we discussed in our last blogs). The collaboration and participation is important because that is what invites the students and teachers into the library (physically or digitally) to make best use of the information provided. I think students being in the library is ideal, but often it takes bridging a gap between the "institutional" feel of a school and students' regular lives with QR codes, Pinterest, and Twitter to engage them. The most effective library websites I found did a good job of piquing student interest through social tools, and then had wonderfully organized information for students looking to use the library resources.

In my mind, if a library website can achieve those two goals, then I envision students learning and being engaged in information fluency and media literacy!

I found a few library websites that I thought were effective. 
  1. The Springfield Township High School Library website uses Smore, which makes the website fairly static (no stream of posts) and requires scrolling instead of navigational buttons, but I think that the content is particularly effective in inviting students to "click" on links, use QR codes to navigate to resources, watch videos, and download helpful apps.
  2. My favorite might be the Wellesley Middle School Library website, which used Weebly. Someone spent a LOT of time compiling resources and making sure that there was no need to "click" more than once to get somewhere within the library site itself. I think Reynolds might have a few critiques about inconsistent alignment and unplanned white space, but the home page of this website draws students in through its use of videos and interactive media, then provides tons of information.
Based on the websites I found, I think that I am going to try a Weebly site. I have tried to use Google in the past, and while I found that it was easier to customize colors, backgrounds, fonts, etc., the layouts tend to be very cumbersome to change (read: lots of time and investment) if someone wants them be visually appealing. Wix and Smore seemed neat, but I think that I envision including a lot more information on a website than would be easy to provide with Smore, and the templates in Wix didn't appeal to me. If I get stuck with Weebly, I will try my luck with one of these others!

Monday, June 15, 2015

the power of words

I want to briefly talk about the This I Believe podcast, and one specific segment in particular: "Never Give Up" by Mary Curran Hackett, broadcast June 1, 2015. Listeners to this podcast hear inspirational moments, experiences, reflections, and lessons from the narrators; Mary Curran Hackett, for example, tells a story about her father's (in)famous speeches to her and her siblings about never giving up. Her narrative form takes the listener from her childhood impressions of her father's lectures to the moment when she realizes the importance of what he tried to impress upon her, and how he never gave up on her. This segment, like many on the podcast, provides reassurance of the meaning behind struggles or challenges.

Podcasts such as This I Believe are narratives read out loud, while others are informational, editorial, persuasive, entertaining, etc. Just like teachers try to expose students to various modes of written text, podcasts provide the same variety, only through audio. If a student can explain the nuances of a written text, then she should also be able to explain how an audio recording is put together with a specific audience and purpose in mind. Thus, by listening to podcasts in the classroom, students can learn more about structuring messages and how stories are told, with the added bonus that they learn about inflection, pacing, and emphasis, and even background effects.

Podcasts, such as the segments from This I Believe, reinforce the importance of telling and sharing stories. Once students have experience analyzing and evaluating the messages of others, they will be adept at telling stories of their own. Podcasts can become an important part of almost any curriculum if students are guided to inform, persuade, or inspire others and reflect on their effectiveness.

This upcoming school year (yes, this one has just ended and I am planning for the next), I want my overarching theme for American literature to be "What is your story?" The more I play around with tools like the image editing and audio sites, the more excited I get about ways I can have students share stories and evaluate stories. (By "story," I mean anything that has a message, which includes pretty much everything.) As I explore American texts with my students, I want them to recognize that explorer accounts, Puritan poetry, revolutionary pamphlets, Gothic short stories, and on and on, are all just the stories of the people who lived throughout American history and who explained their values, beliefs, and experiences in slightly different ways. I hope that by the end of the year, my students have a more defined idea of what their values, beliefs, and experiences are and can decide on a way they'd best like to share this story with their classmates. Podcasting--ideally creating, but at least listening--seems like an integral part of getting my students to that "place" next year, and I hope to use segments from This I Believe to motivate and inspire them.

speaking, listening, and learning


Listen before reading for a justification about why incorporating audio recordings and tools can be useful and fun in the classroom.
  1. Send students to Blabberize, and they can make objects speak by uploading a picture, giving it a mouth, and recording audio. Imagine the possibilities if the rosebush from The Scarlet Letter could explain its meaning in the novel, if a beaker could explain a lab procedure, if visual representations of vocabulary words could use the word in a sentence, or if national landmarks could justify their own importance. Chatterpix is somewhat similar, though it is an app for an iPad instead of an Internet-based tool.
  2. Characters from stories and people from history can be brought to life with Voki, a tool that allows users to create an avatar and let it speak. Students can practice Shakespeare by creating a Romeo and recording one of his monologues, they can give the historical perspectives of famous or notorious leaders, and they can even create propaganda or public awareness campaigns without needing to record any video--with the added benefit that they can put a little more time into speaker credibility without needing stage makeup and costumes. My recommendation for using Voki for any sort of speech, commercial, or PSA is to ask students to create their product for three different audiences and explain how their message and speaker change for each.
  3. What I love about Clyp is that students can record and share audio without the messiness of learning programs such as Audacity or converting and sending files. Clyp makes it easy to record a clip and save it as a unique URL for easy sharing, allowing students to record and share their own stories.
  4. A tool very similar to Clyp is Audiopal. The major difference is that instead of housing an audio recording as a URL that can be shared like a website, Audiopal makes an audio recording that can be easily embedded into a website or blog. My recommendation is to use Clyp if the purpose of the assignment is to practice and evaluate speaking (the audience is the teacher or a few other students), and to use Audiopal if the purpose is to share the message (the audience is the world).


Wednesday, June 3, 2015

experimenting with info graphics and some shocking statistics

This week, I have experimented with creating an info graphic using the tools at Piktochart (piktochart.com). I wanted to create an info graphic I thought could be meaningful in an institutional setting. If I were to create an info graphic on the amount of time I spent on each part of this info graphic (a bit meta-cognitively), there would be:
  • a bar graph with one short bar for deciding on a premise, a slightly larger bar for finding appropriate data, and a very, very tall bar for the amount of time I spent determining how best to convey the information
  • six cups of coffee
  • seventeen "versions"
  • a line graph of my mood as it ranged from optimistic to fatigued to dissatisfied to finally content
One of my biggest challenges was finding a color scheme. First, I wanted to use various colors, but they just seemed to convey a bit too much "fun" for such a serious topic. I tried red, but it looked too severe. I finally settled on different tints of a hunter green on a lightly patterned background.

Figuring out how to give credit to the sources of information was another struggle, because while credit is important, I did not want that text to overshadow the information. I decided to create dividing lines and place the citations right above them, so they would add to the separation in information. I did notice that I needed to attach a fairly large version of the info graphic to this blog, or the small citations would not be entirely legible.

If I have students create info graphics, I will definitely caution them to set aside a significant amount of time if they want to have a finished product that will make them feel proud. I would probably have them research the topic first, so they can find appropriate information, then guide them through determining what type of graphs and charts would be best for their data. I would ask them to brainstorm appropriate colors, fonts, and "images" that would best convey their message. After the prep work, I think they would have an easier job actually creating the info graphic. I think that the preparation and brainstorming would be a large portion of their final grade, because while the finished product is important, and they should learn some basic elements of appealing design, I know that this is incredibly difficult to do.

The best occasions for having students make infographics in my classroom would be when they write persuasive essays or give persuasive speeches. With an infographic, students could "illustrate" their research and the problem.


Friday, May 29, 2015

we've come a long way


The age of technology has ushered in an era of educational buzzwords such as "multimedia literacy" and "21st century learning." In addition to traditional curriculum and preparing for standardized tests, many teachers also feel burdened with the task of making sure students can responsibly use and understand digital tools. I have been playing around a bit with some ideas for incorporating digital images into the classroom, allowing students to experiment with creating and editing visual messages. 

(Note that all links below take you directly to the tool I mention, not the website's homepage.)
  1. Using FoldPlay, students can create their own Fold Books made up of eight images and captions. These small books can be a useful tool for evaluating student understanding or encouraging unique study strategies. Using this tool, students could illustrate parts of a poem, causes and effects of an historical event, real-world applications of scientific/mathematical concepts, or visual representations of vocabulary words. 
  2. BigHugeLabs has a tool that will allow students to create photo mosaics. Students can choose the number of photos, background colors, and border colors, possibly creating mosaics that convey a mood to match a poem or story, argue for a position on a debatable issue, or help represent a culture or concept.
  3. At the beginning of the school year, let students express themselves and motivate each other by using Tuxpi to create their own motivational posters. In an English class, students could even take on the persona of a literary character, or in history, that of an influential person. More advanced students may be able to use the juxtaposition of an image and text to practice satire and irony.
As with anything students "find" on the Internet, it's helpful to remind them that source credit is necessary. It may be beneficial to make an official bibliography mandatory for these assignments. At the beginning of the school year, reviewing MLA or APA rules with fun, less grade-heavy projects allows students to review and practice citation requirements without the added weight of a paper or project. Rules for using images can be confusing, so teachers might want to plan a day or two of instruction about copyright and image licenses. 

love is a roller coaster...

Gratisography.comRoller coaster. CC 0

When I teach poetry, I like to introduce my students to the idea of a conceit by asking them to each contribute an end to the sentence "love is a roller coaster because..." They usually toss my stuffed turtle (won at Kings Dominion) around the room, taking turns. By the time everyone has added their own end to the sentence, the metaphor has become a conceit.

I experimented here by creating a visual of the metaphor "love is a roller coaster," and then adding the text. Instead of having students come up with a quick, on-the-spot sentence completion, it might be fun to have them each create their own visual representation of the metaphor and add their text; the images could all be compiled into a class Google PowerPoint. Then, the conceit can be more interactive and visual for the students.

Quick activities like this one that might only take students 5-10 minutes to complete in pairs can have some meaningful add-ins, like requiring that students cite their images into a shared Bibliography as a reminder of MLA formatting.

To create this picture, I found a found a copyright free image of a roller coaster then used PicMonkey to make it black and white, superimpose a transparent red heart, and add the text.

Monday, May 18, 2015

playing with Wordle


The image above is a Wordle (from wordle.net), a text cloud. Wordle helps make visual the number of occurrences of words. I copied part of Charles Dickens's A Tale of Two Cities, specifically Book the Third chapter 2 "The Grindstone" into the Wordle program. I edited the basic text and colors of my Wordle to hopefully reflect through design a close imitation of Dickens's impression. In my classroom, using Wordle to visualize passages could help students better understand an author's mood or imagery.

Dickens, C. (1999). A tale of two cities. Mineola, NY: Dover Publications. (Original work published 1859)

introducing my blog

My goal is to clearly and legibly reflect on my dabbling with instructional tools and design. In his introduction to Presentation Zen Design, Garr Reynolds (2014) explains the wasaga, or traditional Japanese umbrellas, as a metaphor for the ideal simplicity of design: "The beauty of the wasaga design is a fundamental reminder that simplicity and complexity can live side by side in harmony" (Reynolds, 2014, p.18).

To appeal to simplicity, for the majority of my copy font I chose Droid Sans, which is similar to Frutiger, a font that is "sturdy, legible, simple, clean" (Reynolds, 2014, p. 40 ). I have always found sans-serif fonts much easier to read on a computer screen than serif fonts. As a compliment to Droid Sans, I have selected Droid Serif for some titles and headings. However, I did not choose a font such as Fontdiner Swanky (see it in the attached image?), a more creative, off-centered font; I feared the "noise and clutter" (Reynolds, 2014, p. 29) of the font might overshadow my messages and undermine the professional reflections I am choosing to convey in this space. 

For my layout, I have decided to use light, soothing colors in the background and dark text to provide a strong contrast for easy-to-read words. In a smaller, left column on my blog, I have provided a short "about me" section with my favorite quote and the purpose of my blog, under which is my blog archive. I chose to put this information to the left so that my blog posts and embedded pictures could be left-justified and any white space to the right could add to the cleanness and simplicity of my blog. I did experiment a bit with the width of the sidebar and blog posts, settling on a proportion that I felt most emphasized the importance of the blog content while still making the sidebar legible.

I hope the content and how I have chosen to arrange my blog allow you to join me on my journey through new tools and ideas. My goal is to grow as a professional and individual, perhaps finally reaching a moment of self-realization like Elizabeth Bennet's in Pride and Prejudice. One day, I will be able to join her in saying, "Till this moment I never knew myself."

Reynolds, G. (2014). Presentation Zen design: A simple visual approach to presenting in today's world (2nd ed.). United States of America: New Riders.